Personal Art

Hello Ladies!
Sorry darlings – a.k.a. my special gents out there – but this one is dedicated to your better halves, whether you have met them or not. I for one, would have never thought I’d come to write a blog about make up. Because it’s really not my thing. I mean I love make up. But explaining how and why and why not, it’s not in my blood. I’m more like a guide than a teacher. I can show you, I can explain but… yeah, I’d rather show you. I believe in self-learning because it’s the healthiest way to do things especially when it comes to make up and fashion and accessories because they must be customized to our personality, way of being and taste. I believe it’s wrong to take the beauty market out there and apply it “raw” to our everyday life. Because it might harm our image and self confidence instead of giving us the so-expected “transformation” that is advertised out there.
My mom for example, she hardly ever wore make up. I think she had the same eye liner since she was 20. Until I threw it away. She never wore mascara, foundation, powder, eye shadow. Nothing. As in nada de nada. She loved her pinkish/peachy lipstick and her blue/purple/green eye liner (same ones forever!) and that was pretty much it. But she was always constant in having her toe nails done. Be it winter, summer, whatever, she would always have her toe nails done because somehow, someone told her when she was very young that at all time your feet must well taken care of. A lady like toes, feet and legs. So that is more important to her than foundation. After all, beauty lies in the eye of the beholder and beauty means something different for each of us. And that's the beauty of it, so to say. You can imagine her shock at my wedding when the makeup artist “painted” her face! Pfff! I had to have a “therapy” session with her beforehand so she understands that the person applying the makeup is a professional and there is no way she would mess with her looks, face and whatnot. I said “Mom, just don’t argue with her. Don’t ask her not to add that or the other because she knows what she is doing and there is no need to panic. I have a lot on my mind today so please don’t become one of my worries. Just trust me and trust her. It will be fine.” Poor thing, I love her to death! She did not move a muscle!!! She was motionless like a stone throughout the entire procedure. Not only that the artist put on the entire foundation routine, several eye shadows, liners, mascara and blush, but also false eyelashes! BOOM! And to tell you the truth, when she was done mom looked amazing, but to me, it didn’t look like my mom.
Yeah. I mean, there’s no need to push it when there is trully no need. She was beautiful to me without the makeup. With it on it felt unnatural. It’s like this woman doctor in the hospital where she works; she had died her hair blue and green and purple (all three shades at once!) since before I was born. Before any of these famous celebs now discovered the “electric” colors. They must’ve said she was crazy back in her day. An eccentric. But the truth is, if anyone saw her dye her hair chestnut, they would not like it. Because wearing that jungle thingy in her hair is her mark. It’s who she is and always has been. That’s what makes her unique. I don’t think she cared whether it suited her or the fashion of her time. I don’t think she checked if the tone of her skin and the color of her eyes matched either of those three shades. She just did it ‘cause she liked it and she felt good about it. So, I guess, my main advise would be, stick to what fits your personality not the fashion rules. I know we all say that and we all think that. But how many times have we looked through those magazines and our minds dreamt of fitting some crazy outfits and high heels, dark plump lipstick with black contour and peacock false eye lashes while thinking it would surely make a statement for us once we put it on? They make it look so appealing, so easy, so accessible, so suitable for everyone. In fact it’s not suitable for everyone. And not because we’re fat or skinny, blonde, brunette, red or chestnut. But because we’re shy, we’re retro, we’re rock’n rollers, we’re casual, we’re business, we’re daring, we’re young spirited in our 60s, we’re chick and traditional in our 20s, we’re everything in one or none at all in a weak moment when nothing fits and shit happens and you just don’t give a flying fuck who says what.
Having made a point – haha! – let’s get back to makeup. Like I said, I’m no professional, but I did try to learn as much as possible and I am constantly experimenting because I had no one to learn from so I had to do my own homework. Ladies, to get things straight – I am mostly doing this because I think you’re beautiful, all of you, no exceptions and I want you, I’d love to see you all pay attention to yourself even when you think you don’t have the time, don’t feel like it, it doesn't matter anyway etc because let me tell you. Life will be so much better, the sun will shine just a bit brighter and so will the woman looking back at you from the mirror if you give yourself that time of day to enhance your natural beauty. Even those of you who do not use make up at all – and if you don’t and have no need for it with your flawless skin – read this and always remember to have one or two makeup items in your home or purse because they will always come in handy. For some makeup is a necessity because of skin imperfections, perfecting some angles or simply because it makes you feel womanly and dolling up is something you enjoy. For others, makeup is not a prerequisite to feeling better, boosting your confidence or putting on a mask when the times ask for it. And that’s great. I admit I wish – even though I love makeup! – I wish I had that perfect skin that wouldn't require foundation all the time. Unfortunately because of my hormone problems and mixed skin type that’s an impossible dream. But as long as we accept our problems and not make a huge issue out of them, there is always a way to take care of our skin and also wear a type of makeup that will help with the imperfections and not damage the skin further.
So, I thought of keeping it simple and just show you some pictures of a natural, day to day make up. Pretty much something everyone can do no matter how much of a beginner you are. You can use whatever color you like, or, if you’re into matching colors than perhaps you should stick to those colors that compliment your skin or eye color best. I prefer normal matte eye shadows, not the sparkly ones. I also like the mineral ones, but with those you need to be careful as they require a more masterful hand when applying them. Otherwise they will be all over your cheeks. Talking about that, for those of you who enjoy dark colors there are two ways – that I know and use – to avoid getting that all over your face and look like you’ve been beaten haha.
1. Put a larger amount of powder (just get a cheaper powder two shades lighter than the one you normally use) and put it underneath your eyes from one corner to another. The dark eye shadow fall on that instead of your skin. When you’re done, just swipe it off using the powder brush. The skin will look mattified and will bear no dark shades.
2. Do your eyes first and then the foundation. No matter what falls on your cheeks, you can just clean it off and then do the foundation routine around it. For me this is weird sometimes because I usually do the foundation and then the rest so getting out of this pattern is abnormal. You know how the mind works when you’re used to doing something one way, it’s hard doing it differently. But try it! It does work miracles!
Talking about routines, perhaps before we even begin discussing makeup, you should know that a set of brushes it’s a must. The age of spreading the foundation with your fingers is almost over haha. Yes, the foundation warms up on your fingers and gets blended better, but then again it also rubs into your skin much better so whatever is not that healthy in the foundation will probably enter your pores faster. Of course, it’s a twisted theory. After all, any foundation, regardless of the way you apply it, stays on your face long enough to harm it if it contains too many chemicals or has expired. So, even though you may apply your foundation the “traditional” way, you still need brushes to apply the eye shadow, blush, illuminator and bronzer. The little things that come with your eye shadow palette won’t help if you ever want to reach the next level and learn how to blend a few colors. I don’t really care what brand the brushes are. They should be made of natural hair. If they are too expensive, get them from synthetic material, but make sure they are soft and well built. If you have never purchased these yourself, I say better go to a specific store and ask for advice, take a good look at the size and shape and then go buy them someplace else affordable. I suggest you buy whole sets instead of getting them by piece because they are more expensive. I got mine, time and again, from this website in the States: www.coastalscents.com. Everything I got from these people was gorgeous. Eye shadow, eye liners, bronzers and especially brushes. And I’ve had them for years. The prices are great, shipping is good and not too pricy and they always included a little gift in there. I’m really happy with them. I mean, a set of brushes and 2 lip quads plus shipment cost less than buying all those brushes and nothing else from Sephora. So imagine that!
The black set is similar to what I have. In time I added a blending brush or two on top because I need some for dark colors and some for light colors. Otherwise you'll have to wash them very often to not end up putting dark brown instead of gold because the brushes are all dirty from your previous makeup. Please - always remember - you need to wash your brushes at least once a month because they collect all the dust and dead cells from your skin and tones of old make up which will damage and infect your skin on the long run. Just use your shampoo or a hidarating bar of soap to clean them. Wash them until there is no more color combing out. Press them gently on paper towels, wrap them each in one and let them dry over night. it really is that easy and healthy!


What does each brush do? It’s no rocket science. Any 17 year old on You Tube will show you. You don’t actually need all those brushes so if you’re not into heavy makeup or the more complicated ones, take the basic sets. The essential ones, as far as I’m concerned, are as follows:
- Powder brush
- Contour brush
- Blush brush
- Habuki brush (if you want one to travel with – it’s pretty much like a pocket size powder brush)
- Foundation brush
- Concelear brush
- Dome shadow brush
- Fluffy shadow brush
- Angled shadow brush
Yes, we all have other names for them haha. The fluffy one I call it blending brush. It takes a little to figure out which one is which and what they do and then it all becomes natural. It’s a small investment of your time to learn how to use them properly considering the life time benefit you’ll enjoy. So have those and you should be fine.
Skin care
This is the most important step before makeup even touches your face. I know. We’re all busy and in a hurry and you did wash your face last night. You even took a shower so why clean my face again! My bed is not that dirty! Yes it is!!! Just kidding haha. I’m not good with the theoretical part, but at night your skin becomes oily and it has to be cleaned off in the morning. I use Avène products. They are a bit more expensive but it’s what the doctor ordered for my problematic skin. Regardless, the idea is: have a cleansing gel, use that first. A toning lotion second. I bet you’ll see that the cotton disk will look a bit dirty in the end. I use the toning lotion on my neck, neck line, ears, behind my ears, back of my neck and shoulders. All the areas more exposed to dirt during the day. At least they should start the day all fresh and clean haha. Then I use a 50+ sun protection body lotion also usable for face from La Roche-Posay. Also quite expensive. But it’s pretty big and I only need a little because it’s very hydrating so it lasts for a long time. Also recommended by the doctor because I need constant sun protection to prevent the darker spots on my face to turn even darker, especially that I tan quite fast and have a darker pigment. Once I’m done with this, I start applying the foundation.


Foundation, concealer, powder, blush, illuminator, bronzer routine
I use the brush to apply the foundation. I don’t have a certain brand. Usually I use Sephora, sometimes I use Maxfactor. It depends. I go for medium colors or darker ones in summer if I get a tan. I like to keep them a bit more liquid when it's hot outside because I sweat and my face can itch with the pores all clogged in sweat and make up so the lighter the formula the better. In winter I can use thicker more compact one. In terms of quantity, I am trying my best to use as little as possible just to give that uniform look and not turn it into a facial mask. For those little spots that I want hidden I just put a bit more on them and that’s it. Or I simply tap the brush on top a little more. Don’t bring the foundation all the way into your hairline or temples. It will mix with the little hairs and look sandy and weird. Bring it as high as you can and then gently blend it with your fingers. Make sure the foundation is applied all the way to your jaw line and a bit underneath it so you don't get that difference in color between your face and your neck. Make sure you have applied it uniformly. Not with small traces left behind from the brush or too much in one spot than in another. It will make your face look like a carelessly painted wall!
The powder I use is probably the most expensive of them all. Because it’s the one that fixes everything in and if you get it wrong as texture or shade, it can mess everything. It’s hard to match the shade of a foundation with the shade of a powder. Get one wrong and it’s all going darker. So I use mineral powder with no color from Too Faced. It literally doesn’t add any shade to your foundation. When I get sick of that, I love to use a Mac powder (I love Mac. That’s it!). This powder has some foundation in it as well so I use it mostly in summer when I use less foundation or almost none at all if my face is good. So be careful to use the right shade. I also get a tan so with it being darker, it matches my skin tone. I apply it with circular wide movements with the powder brush. Remember the powder helps to keep the shine of your skin under control if you sweat. Also it sets in the foundation to last for the day so the purpose is to have it as a top coat not like an extra kg of make up on your face. So be gentle with it and just give it a slick brush don’t tampon it on each inch of your skin. Same with the foundation. Some of you may use a sponge to apply foundation. For me that puts too much of everything on my face. I use it when I go out in the clubs for example, where a stronger TV like makeup is needed to be visible. But during the day I stick to the minimum quantity.


I am not very fond of blush, I have to admit. I like bronzers more because they contour my face and give it a special glow. But if I do use a blush I use very light pink or peachy colors to literally just put a little color on my cheeks. Use the angled brush to do that. Pout your lips to see where your cheek bones are and apply it on them. A trick to keep it from falling lower to end up with a huge pink cheek on each side, is to use an acces/credit/metro card or whatever it’s in handy. Put it right underneath the area where you want to apply the brush and when you’re done remove it. All the extra blush will fall on it and you’ll be left with a clean cut. Take the powder brush again and blend that line in so it doesn’t look so geometrical. Same trick can be borrowed from PIN UP makeup where on the corner of your eye to the end of your eyebrow you add tape and then apply the makeup. All the leftovers will go on the tape. Take it off and you’ll have a clean cut no shaky hands could draw.


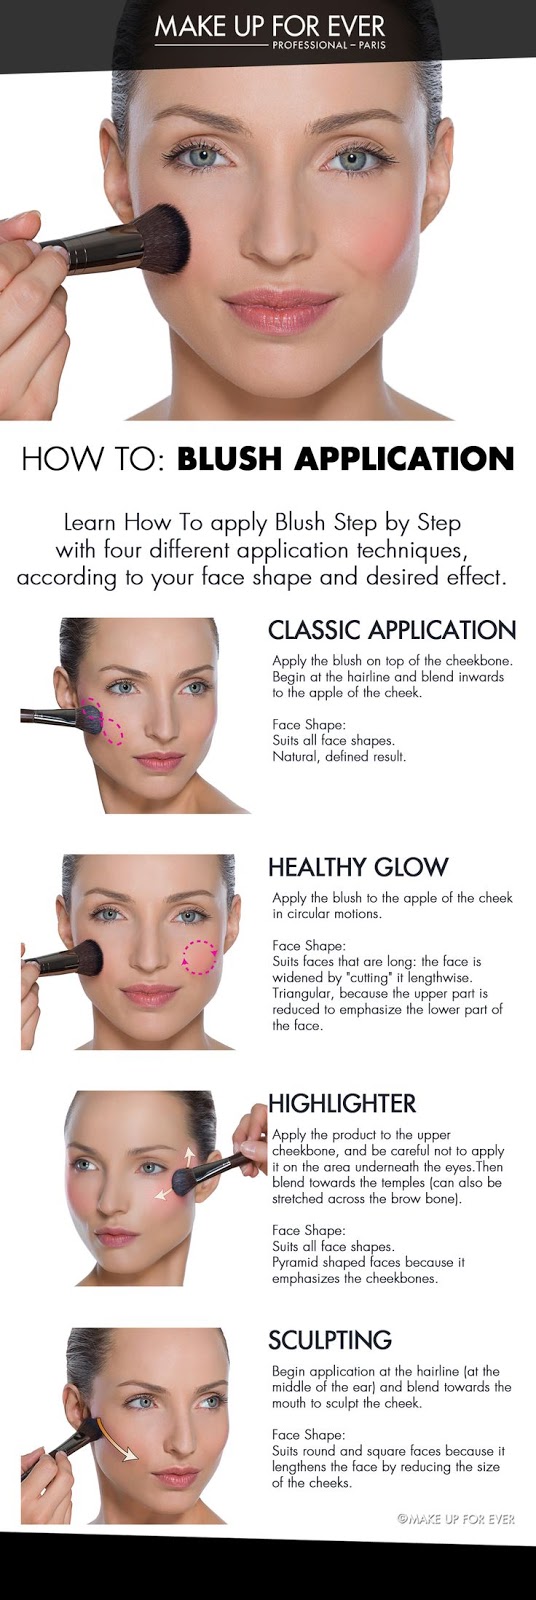
The order with this is the following. First, right on top of your cheek bone, closest to your eyes is the illuminator. Then the blush underneath, then the bronzer. Or whichever works best for you. The bronzer should be underneath your cheek bones to make them stand out. I’m attaching a few pictures with tips on how to apply them depending on the shape of your face. If it’s square, you can make it look rounder, if it’s wide you can make it look elongated. There are lots of tricks to contour and sculpt your face but honestly, unless you’re thinking to go deeper into this art and get contouring kits and all, I’d stick to just your cheeks with these three functions. Choose your colors carefully. I know you might like a pale skinned woman wearing her plump blush, but perhaps on your dark toned skin it will look like literally two plumps stuck on your face. Play with eye shadow, don’t play with bronzers and blushes. They will make you look like a badly manufactured China Doll. Again, I don’t always do illuminators because I use concealer. I will show you how to use that not just underneath your eyes but also to contour your eyebrows better.

When it comes to concelear, if you don’t really have dark bags under your eyes or a face complexity that requires it, don’t apply it just for the sake of it. For me, foundation is enough underneath my eyes. So I use concealer almost like an eyeliner under my lower lashes and on top to contour my eyebrows.
Eyebrows
So you’re done with “the face”. Eyebrows are pretty simple. I like them to look as natural as possible, I like them curved not pointy and rather thick than skinny. And looong. But that’s what fits my face. All you need is an eyebrow pencil (I used Sephora and Mac. Mac are better but twice the price). Get one that matches the color of your eyebrows. Blonde ladies. Don’t go for dark brown just because you want your eyebrows more visible. They will just look more fake. Use a light brown and special golden mascara for eyebrows to sweeten that brown and fix them in place. The rest of us, use something not as dark as your eyebrows otherwise they will go even darker. Of course, it is also a matter of taste. Also, get one of those small eyebrow kits, with a brown shade, eyebrow wax and brush. It’s all you need on top of the pencil. Just follow the steps in this picture and your eyebrows should look amazing. Once your done with the pencil, shadow and wax (don’t apply to much of that. It will act like hair spray and attract all the dust and whatnot throughout the day. If you don’t need it, don’t use it) use a small concealer brush and apply concealer under your eyebrows to contour them to perfection. It will also help set in the eye shadow later and lighten the area above your eyes.


Applying the colors
Always have a nude matte color close by. It’s hard finding one that’s not sandy, goldish, sparkly, rosy, too nude or too white. Find the right one and stick with it. It should be invisible on your skin and it needs to be because it goes all around your eye as the first step in your make up. You need the eye to be a “blank sheet” on which you can draw with colors. I use one from Avon and I really love it! Now. I can’t really explain how and what to do. Depending on the format of your eyes you can apply one or more types of makeup. If you have my kind of eyes, one line will cover it all. If I blend any colors, I’d have to walk with my eyes closed so you can see it on my eye lid haha. Mom on the other hand has quite some space in there, a very visible eye lid and you can see the blend. Lucky her. But that shouldn’t stop you from blending colors. Here are a few ideas.


For those of you afraid of eye liners – because you can’t keep the line straight! – here is a trick to work your way around it. And keep practicing. Before you know it, you’ll have the perfect touch. Just make sure your pencils are sharp. It will help with the drawing. Or use solid eye liners that are a bit creamy but not too much and can be applied with the angled brush. Maybe that could work better for you. As a last alternative, when no matter what you try or use, that line still doesn’t come out right but you do want to use a liner to give a little depth to your work, use a Kohl Eye Liners. This eye liner, unlike the others, is very soft. It almost melts so be careful when you sharpen it. It always (or should always) have a blending sponge or brush on the other end. The idea with this liner is to trace that line however you can and then with the other tip blend it gently at the base of the lashes. It won’t be a line anymore but the black will stay and it will give a nice deep shadow. It’s also great for the watery line because it’s so soft.


A good thing to have, both those who are into makeup and those who use it on occasions, it’s a white eye liner. It always enlarges the eye, makes it look brighter and when used against darker colors, the effect is WOW. In terms of other tricks for makeup, try to keep dark colors away from the inner corner of your eyes, unless you’re just using one color all over. Don’t be afraid to come up with whatever combination. If you blend 10 colors in they will look like one. Blending is essential. It will turn your eyelid into a wave of flattering colors and all you need is that blending brush and stronger circular movements.

Don’t be afraid to use electric colors when need be. Just be careful not to stain the rest of the makeup. Use creamy colors instead of powders but always be careful to give a second touch every now and then because they tend to “gather” in the crease of your eyes and that’s not pretty. Add, change, play. That’s the whole point with this art. To be creative and to make it unique so it shows your originality!


Lipstick
And finally… Yeah, I’m pretty bad at this. I like all colors, but as I am at work every day, I use lipstick when I leave home and “eat” it with lunch and never really reapply it throughout the day ‘cause that’s my last worry! Haha And I do it again when I leave work just to give a pink kiss to my cat when I get home. I do tend to keep a balance between my eyes and lips. I usually use stronger colors on my eyes so my lipstick is always neutral or natural looking. Like pink, peach, coral. Nothing mocha or chocolaty; my skin is too dark for that. But I like my reds, copper, strong coral, auburn, plump, even black and mauve. Then I just use a simple black eyeliner and one neutral eye shadow. If the occasion allows it, I do both strong. That’s when I go clubbing and that’s when I go insane.


I don’t use lip glosses because I feel uncomfortable with them. Like I have some liquid thingy on my lips. It also makes the lipstick underneath more liquid and it comes down through the cracks messing with my lip contour. I always have to wipe it clean from under my lower lip and even my upper lip. And my hair gets tangled in it all the time!!! So that’s a no for me. In terms of taking care of your lips in general – if you go jogging, if it’s too cold or too hot, if you have an agitated day and have the habbit of biting your lips – always have a chopstick with you. A balm of your choice, fruity, plane whatever. I have a few at home because I always misplace them in my hand bags so I need reserves haha If you’re using matte strong lipstick colors, your lips have to be in perfect shape. Like perfect shape. Flaky cracked dry lips can’t take red nor any of its siblings.


If you do want to try it out, try this first. Take one of those eyebrow brushes, add as much balm as you can and then brush your lips as if you were brushing your teeth. Gently. Until your remove the flakes and you feel your lips pinky and moist again. Remove the balm and then tap the foundation brush on top to take the moisture away so the lipstick “catches” on. Then apply the contour. The contour has to either match perfectly the lipstick or be lighter and of the same nuance. If you really want to draw this to perfection, before doing the lip liner, take the concealer brush or anything smaller and contour the outer line of your lips with concealer or lighter foundation to make them stand out. Make sure you blend that in, otherwise it will just look bad. Then the lip liner. Don’t just contour the lips with it. Bring it in a bit, especially towards the corners of the mouth, fill the lips up a bit with it. Then add the lipstick. If it’s a dark or strong color, it’s better to use a lipstick brush because you can’t contour the lips with just the lipstick and you’ll ruin all the work you’ve done so far and that would be a pity. Make sure it blends in with the lip liner. If need be, use them both back and forth and until you get them right. If it feels like too much on your lips, give a paper towel a kiss and problem will be solved. Remove and spots or smears using a Qtip not your fingers. You'll just make it worse. Then take another clean paper towel, apply it on your lips without pressing and tap the powder brush on top the paper towel. It will help fix your lipstick better. If you’re into lip gloss, add that at the end. Not too much, otherwise it will smear the layers underneath.
False eyelashes
I left this at the end because I don’t use them on an everyday basis. I know some of you do. There are so many ways of having those now. I honestly believe, wearing them all the time, whether knotted to your real ones or by using that special glue, will eventually harm yours. I have a friend who after wearing them for too long almost lost hers completely. It took some time and treatment to get them back. I am not sure the Hollywood effect of such lashes is worth while the panic that comes with the aftermath of overuse. Like everything in life, too much is bad. I use different types: one piece, cluster or halves for the corner of the eye. I prefer cluster more because I can just use a few and they look random and natural. Second best is the ones just for the corner of the eyes because they also give a more natural look. I like them medium or short. I prefer volume over length because to me too long is fake. Sometimes though I indulge into long ones but I wear them alone with a simple eye liner and that’s it.


Make sure that when you use one piece you first put them on the eye lid to measure them against the length of your own. Trim them accordingly then add a thin layer on the strip and glue them however it is comfortable for you: using your fingers or a tweezers. Or both. Before putting them on, apply mascara to your own eyelashes, make sure they are not stuck together. Don’t add too much as the false ones are coming on top. Wait a little for the glue to dry and then you can touch up the eye liner to make sure the base of the false eye lashes is not very visible.
There are false lower lashes as well. I have never used them, but I would for the corner of my eye. The really thick ones cut my visibility. On my bachelorette party I wore feathery lashes. They looked great but I couldn’t see a thing most of the time haha. So those come at a cost. In the darkness of a club they might help with making you trip in the arms of (hopefully) the right guy! haha
Well, I hope this is helpful in the least. I’m really not good at this, but I hope I made sense enough to give a helping hand to those of you who are either giving it a try for the first time or are eager to find new tricks to improve. I know I always find something new and amazing! And please don't think of makeup as a way to "hide" imperfections. We all think something is "wrong" with us, whether we are too short and need high heels, too curly hair when you want it straight, legs too thicvk, arms too skinny etc. We need to do what makes us feel comfortable in our own skin. It's hard loving yourself when you think some things are imperfet and you keep comparing yourself with others, directly on indirectly. So if next to great friends and some solid overall trust and confidence in who you are and that a pimple, a pound extra and flats won't damage your personality to the extreme - you also need makeup, clothes and shoes to boost your beautyful self, then go for it! And that's that!
Here is my make up today. I usually match the colors to what I am going to wear. Hopefully I won't change my mind last minute like I know I can haha. I used 4 colors: the nude first, then green all over the eye lid, then blue on the outter corner of my eye and blended the two in the crease of the eye with a dark gold mustard like color. And then I blended the edges to that with the same nude I used in the beginning. The blue sky eye liner I used on the water line is from Avon. They have some pretty good stuff when it comes to eye liners. I think I have all the colors. Then the black one on top is a Khol eye liner from Sephora. Very decent, very good. I used two mascaras, also from Avon. One new and one older because the newer ones are always more liquid and my eye lashes get stuck together. The older one is dry and heps me add volume while separating the lashes. The lipstick is a lip gloss kind of format, it's incredibly soft and creamy when you first apply it and because of the brush you can contour the lips perfectly without lip liner. After it dries it sticks to the lips in an amazing way and becomes rather matte. Also from Sephora.


Here is my make up today. I usually match the colors to what I am going to wear. Hopefully I won't change my mind last minute like I know I can haha. I used 4 colors: the nude first, then green all over the eye lid, then blue on the outter corner of my eye and blended the two in the crease of the eye with a dark gold mustard like color. And then I blended the edges to that with the same nude I used in the beginning. The blue sky eye liner I used on the water line is from Avon. They have some pretty good stuff when it comes to eye liners. I think I have all the colors. Then the black one on top is a Khol eye liner from Sephora. Very decent, very good. I used two mascaras, also from Avon. One new and one older because the newer ones are always more liquid and my eye lashes get stuck together. The older one is dry and heps me add volume while separating the lashes. The lipstick is a lip gloss kind of format, it's incredibly soft and creamy when you first apply it and because of the brush you can contour the lips perfectly without lip liner. After it dries it sticks to the lips in an amazing way and becomes rather matte. Also from Sephora.


So enjoy the adventure and have a great Friday and a sunny weekend!
Mwuah!
Comments
Post a Comment